Origin of Warli Art
Warli
folk paintings are the painting of Maharashtra. Warli
is the name of the largest tribe
found on the northern outskirts of Mumbai, in Western
India. The word “ Warli” comes from “warla” which means a piece of land or a field
Despite being in such close proximity of the largest metropolis in India, Warli tribesmen are still not
urban. Warli Art was first discovered in the early seventies. While there are
no records of the exact origins of this art, its roots may be traced to as early
as the 10th century AD. Warli is the vivid expression of daily and social
events of the Warli tribe of Maharashtra, used
by them to decorate the walls of village houses. This was the only means of
transmitting folklore to all others who are not acquainted with the written
word.
Theme of Warli Art
These
paintings do not depict
mythological characters or images of deities, but depict social life. Images of human
beings and animals, along with scenes from daily life are created in a loose
rhythmic pattern. Painted white on mud walls, they are pretty close to
pre-historic cave paintings in execution and usually depict scenes of human
figures engaged in activities like hunting, dancing, sowing ,harvesting, going
out, drawing water from well, drying clothes or even dancing.
Warli
paintings on
paper have become very popular and are now sold all over India. Today,
small paintings are done on cloth and paper but they look best on the walls or
in the form of huge murals that bring out the vast and magical world of the
Warlis. For the Warlis, tradition is still adhered to but at the same time new
ideas have been allowed to seep in which helps them face new challenges from
the market.
The typical subjects
on which Warli Art is
done are :
Festival
Harvest
Folk story
Celebration
Temple
Marriage
The major highlight is these all have people in group depicting the social
life.

Patterns of Warli Art
It
basically consists of geometrical patterns
•Circle: representing the sun and
the moon
•Triangle: triangle derived from
mountains and pointed trees
•Square: indicating a sacred
enclosure or a piece of land. So the central motive in each ritual painting is
the square
These geometric figures are joined together to form beautiful patterns .Like
two apex of triangles are joined together to form a human figure.
Regular Warli Art classes and workshops are conducted in HSR Layout Sector 2. (Bangalore)
If you are interested in attending these workshops please visit http://hobbyworkshops.blogspot.in/2014/03/warli-paintings-and-warli-art-classes.html
Method of Warli Art
Warli
paintings are ancient painting made on the walls with natural colours. The colours used were not
permanent . But the paintings were made again on different occasion .
Typical
Warli Paintings Background colours
Warlis typically use all dark colours as a background, by applying the following colors from the nature :
· Henna
· Indigo
· Ocher
· Black
· Earthy mud
· Brick red
But you can always Experiment with background colour. As contrast to typical
Warli background try and experiment with vibrant colours.Can even combine two
colours to make the background...Just like half red and half black in the Warli as seen below.
 Now that we have observed several Traditional Warli Art, lets try giving a twist to this art form by adding some colors to it.
These kinds of colorful Warli figures look amazingly modern and help preserve their traditional origin at the same time.
This one is a greeting card and the next one is a canvas painting.
Wow, look at this Wall Clock and Wall Frames, aren't they simply amazing!
Lets try making them......
1. You need to take, a Basic Wall Clock with White background.
2.Use acrylic colors as they are more shiny and durable than poster colours.
3.Draw the Basic Human Figures, in place of the numbers for a clock. you may check this link, for a step by step directions, to draw human Figures.
http://hobbyworkshops.blogspot.in/2012/01/blog-post.html
4. Keep it as colorful as you can as we are using White background, all rainbow colors are used in this clock and a rainbow design is also made on the edges.
5. You may use other Warli Designs as well for the edges, or you may just cross the edges with parallel lines as we do for crossing a cheque.
6. Put Battery in your clock and let it do wonders...
The Wall Frames are also decorated in a similar fashion. you can refer to the Tarpa Dance post from my blog to get a closer view.
http://hobbyworkshops.blogspot.in/2012/01/blog-post.html
Now that we have observed several Traditional Warli Art, lets try giving a twist to this art form by adding some colors to it.
These kinds of colorful Warli figures look amazingly modern and help preserve their traditional origin at the same time.
This one is a greeting card and the next one is a canvas painting.
Wow, look at this Wall Clock and Wall Frames, aren't they simply amazing!
Lets try making them......
1. You need to take, a Basic Wall Clock with White background.
2.Use acrylic colors as they are more shiny and durable than poster colours.
3.Draw the Basic Human Figures, in place of the numbers for a clock. you may check this link, for a step by step directions, to draw human Figures.
http://hobbyworkshops.blogspot.in/2012/01/blog-post.html
4. Keep it as colorful as you can as we are using White background, all rainbow colors are used in this clock and a rainbow design is also made on the edges.
5. You may use other Warli Designs as well for the edges, or you may just cross the edges with parallel lines as we do for crossing a cheque.
6. Put Battery in your clock and let it do wonders...
The Wall Frames are also decorated in a similar fashion. you can refer to the Tarpa Dance post from my blog to get a closer view.
http://hobbyworkshops.blogspot.in/2012/01/blog-post.html


Now lets use this Warli Art on some other interesting objects........
This Fabric painted pillow, with a Warli figures is simply looking amazing. Its been stitched using a beige colored satin cloth and a set of Pearl Fabric colours are used to decorate it with some Warli Human Figures.
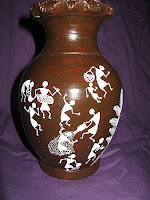
The Warli Earthen Pot Painting/ Flower Vase Painting is very simple:
1. A plain Flower Vase is being used here.
2. you need to bring a small Paint box in brown color from a hardware shop. (Note: its the same paint used for coloring walls,which has a kerosene base)
3.Soak it in Water for 3-4 hours, as it removes the dirt and grimes from the pot.Allow it to dry for a day.
4.Rub the Vase with a Sand paper to smother its surface, now apply the brown paint all over its surface with a thick paint brush(you may require some nail paint remover to clean this brush after use). Allow it to dry for few hours
5. Take any white colour, poster colour will also do. Draw Warli figures with a thin paint brush as per your choice. Some Warli Musicians are drawn on this pot. let it dry again.
6. Apply clear varnish (get it from a hardware store) on the entire pot for durability of your art work. The varnish also adds some shine to this Vase.
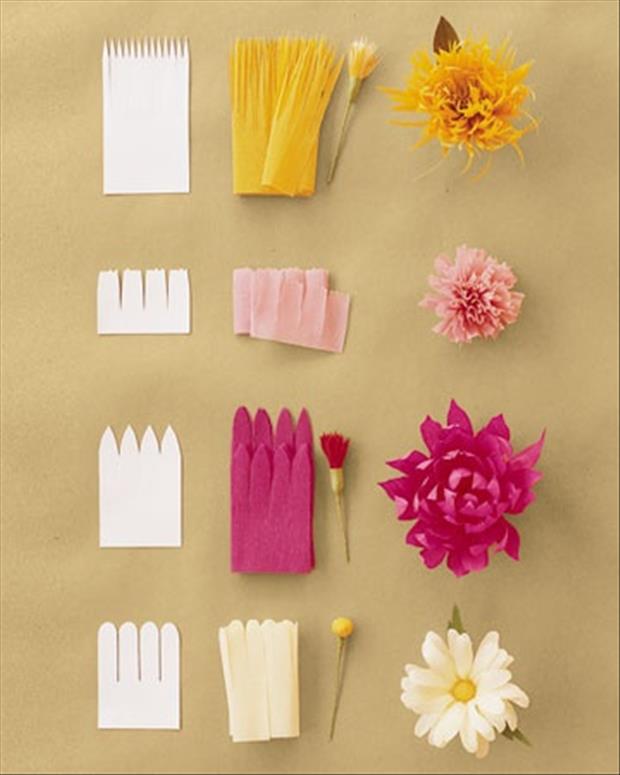
Your Vase is ready....add some wonderful hand made flowers to it
http://hobbyworkshops.blogspot.in/2012/01/blog-post_7111.html

Now lets explore more on what all artifacts and Art experiments, that we could make out of Warli Art..
Did you image such a simple Warli Art could looks so Trendy?
All the Best to all the Art Lovers........
Please Try making these and keep me posted......you may mail me at hsr.hobbyworkshop@gmail.com for any craft ideas, suggestions or queries you have. would love to take them
HAVE A NICE DAY!


.jpg)


