De-stressing Creative Craft Workshops

We conduct Corporate and Student Workshops for De-stressing, team building and enhancing creativity through numerous hobby and craft activities.

We also undertake craft projects/ fun & creativity workshops for Charitable organizations on request basis.

If interested please contact us via -
Email at

hsr.hobbyworkshop@gmail.com
Phone: 9886398171

Thursday, 19 September 2013

De-stressing Corporate Workshop on Paper Roses.....what a fun!

 De-stressing Corporate Workshop on Paper Roses.....what a fun!

Look at this pot decorated with some yellow Paper Roses made from a duplex paper......did u observe that the pot is also a paper craft. Its made from a simple black card paper.
What a nice idea to gift a friend!

Well, want to try making it? you need yellow duplex paper, a black card paper and a green card paper
Also get a pair of scissors, glue, marker pencil, and a simple thread (preferably yellow in color), and small string

1. For a big Rose, you will require 6 big petals, 8 small petals. Draw the Petal shapes on the duplex paper and cut them. Roll their edges to give a natural effect. A duplex paper can be stretched and expanded at the center of the petal also to give curvature to the paper petal.

2. Take the string in your hand. join two small petals face to face with the thread and tie them around the string. your center is formed.

3. Keep Adding small petals with the help of the thread, increase the volume of your paper rose flower.

4. Once your are finished with the small petals, go on adding the big petals, with the help of thread
(in case you are not confident of the thread, you may use the glue)

5. Your big rose will be ready, similarly make the two medium size roses also.

6. Make a card paper pot, or take a ready made pot. you can also decorate an extra plastic container at your home, to make a shallow pot.

7. Arrange the flowers as shown in the picture and add leaves to give that extra effect.

8. Your return gift is ready

You may also try making these beautiful White Rose arrangements, made out of Duplex White paper.
you may even make use of ice cream sticks to form the background wooden base.


Please Try making these and keep me posted......you may mail me at hsr.hobbyworkshop@gmail.com for any craft ideas, suggestions or queries you have. would love to take them

HAVE A NICE DAY!

Monday, 16 September 2013

Got many damaged and old CDs......lets make CD Craft

We are in an IT era and all of our House holds are saturated with hundreds of CDs. A good number of these CDs are damaged are scratched by Kids and pets.

Sort them out a get some of them to do these simple and wonderful CD crafts....I bet it will be really interesting and stress relieving ....

Get some old CDs, Satin ribbons, Glue, Stetch  pens/Markers, Googly eyes and Some waste Craft Papers and indulge yourself and your kids in some creative activities.....

Fishy-Wishy CD Craft :-)
Metallic colours are used on the half cut CDs, they are also decorated with beads and strings (ready made sequences are available in the market) for a wall hanging effect. They can be made as returns gifts
for your house party.

Wow a master piece on your study table
 Kids, gather 6 damaged CDs from your CD collection and Go and Make this 3D Cd Box, and hang it outdoors. look how it catches the sun....it works just amazing!
 Look at this Christmas Wall Hanging made out of old CDs, isn't it simply amazing....

What A Fun Way to learn maths....

Look at this its so easy and creative, even kids will love it. make it yourself and give it on our kids birthday...

 this is so cute :-) isn't it ......a CD Mouse ! hang it in your room and enhance its decor. 

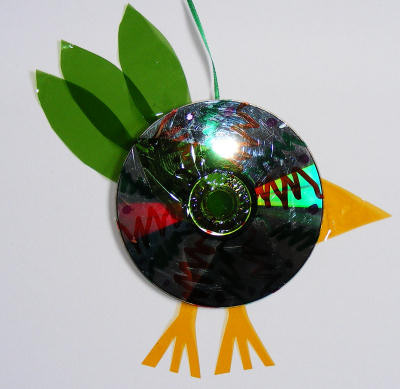
You may even try making a Bird out of  a damaged CD, it may come up something like this....
  or you may even go for these cute BUGS... :-)

HA HA ....isn't this Fun ?

Lets check it out more......may be some difficult stuff...

How about a roaring Lion....

OR some Tea Coasters..... Make them in to a set of 6 and you may even Gift them.....


And this one's a bit tricky......but why don't you try that out for yourselves.....


OMG.....Yes, All of these are from scraped, damaged, old CDs, isn't this simply wonderful.....

Please Try making these and keep me posted......you may mail me at hsr.hobbyworkshop@gmail.com for any craft ideas, suggestions or queries you have. would love to take them

HAVE A NICE DAY!


Wednesday, 11 September 2013

Felt Fabric Flower Craft

Felt Cloth Flowers Clips


It is very simple to make Flower Clips from the Felt Fabric.
Steps:
1. Cut a Flower shape from a 2inch by 2inch Felt cloth of your choice.
2. Fold the Flower in in half, and then in to quarter. Make such five quarters and one small quarter.
3. Place all the four Quarters in the manner shown below, and stick them

4. Stick the fifth Quarter above the petals, followed by sticking the small quarter in the last.
5. Allow your Felt Fabric Flower to dry for few hours and paste it on plain hair clips of your choice.
6. Your Felt cloth flower clips are ready.

Felt Fabric Flower Hair Band


Felt Fabric Flower Key Chains


Please Try making these and keep me posted......you may mail me at hsr.hobbyworkshop@gmail.com for any craft ideas, suggestions or queries you have. would love to take them

HAVE A NICE DAY!

Saturday, 7 September 2013

Finger Rangoli: A different style in Rangoli making


Before Staring any design Rangoli(except Sanskar Bharati),  ensure to mix some white colour to the rangoli powder, if the colour powder is highly smooth. Adding white colour will make its texture coarser, which will be easy to hold in your pinch.

Lets start the Finger Rangoli
1.Dump and Huge Dot of Rangoli powder on the desired surface. Put your Index finger at the center of this big dot and make circular movement, a ring will be formed.
2. Drop one more huge drop above this ring and repeat your finger action there will be 2 rings.
3. Five of these rings in a group, make a flower. You can add contrast colour in the center of the ring to give colourful effect.
4. You can also make leaves pattern using green colour in a similar fashion.


Please Try making these and keep me posted......you may mail me at hsr.hobbyworkshop@gmail.com for any craft ideas, suggestions or queries you have. would love to take them

HAVE A NICE DAY!


A Butterfly Pencil Holder for Kids


One more version of the Butterfly Pencil/ pen Holder, created during this Summer Camp


You will require the following raw materials for making the above Paper Cup Butterfly Pencil Holder:

1. A tall Paper cup for the Body of the Butterfly
2. Handmade Paper/ Chart Paper for the Wings
3. Velvet Stings (one which can be twisted)
4. Google Eyes (optional)
5. Some color papers and paints for decoration

Have a keen look at both the pictures and you will figure it out, how that's been made, its really simple.


Please Try making these and keep me posted......you may mail me at hsr.hobbyworkshop@gmail.com for any craft ideas, suggestions or queries you have. would love to take them

HAVE A NICE DAY!

Amimal Pencil Toppers: A unique way of Pencil decoration


Please Try making these and keep me posted......you may mail me at hsr.hobbyworkshop@gmail.com for any craft ideas, suggestions or queries you have. would love to take them

HAVE A NICE DAY!

A Huge Lotus Paper flower prepared for Ganesh Utsav

Please Try making these and keep me posted......you may mail me at hsr.hobbyworkshop@gmail.com for any craft ideas, suggestions or queries you have. would love to take them

HAVE A NICE DAY!

Monday, 2 September 2013

Create a Simplest Sanskar Bharati Rangoli


Requirement:
1. 4-5 vibrant rangoli colours (Do not mix the colours with white colour. keep them in smooth powder form)
2. A Tea Stainer (medium size)
3. Some flower petals and leaves (optional)

Procedure:

1. Put a rangoli colour powder in the tea stainer and make the center circle by a light sieving action
2. Make a symbol of your own choice inside the circle, with white rangoli powder. eg. OM, Shree, swastik, etc.
3. Put bold and prominent white colour Dots along the circumference of the coloured circle.
4. extend your rangoli pattern by adding more colour circles along the center circle. use nice colour combinations.
suggested combinations- red, yellow, orange (hot colour scheme) or Purple, light blue, dark Green, parrot green.

5. Draw petals of white colour with the help of the inner circle dots as seen in the Rangoli.
6. Give additional layer of flower petals and leaves if required.

Some other Designs


Please Try making these and keep me posted......you may mail me at hsr.hobbyworkshop@gmail.com for any craft ideas, suggestions or queries you have. would love to take them

HAVE A NICE DAY!